Aliasing
A major problem when synthesizing an image on a digital computer is that a computer monitor cannot represent a continuous (analog) signal. Through our eyes, or by using a camera, we can see an analog picture. Every line, curve, and tiny object in the image is represented exactly. When using a computer to simulate this image it is impossible to generate an exact photo replication. This is because computers are restricted to using a finite number of pixels to represent an analog signal.
You might argue that by using a computer monitor with a higher resolution it must be possible to overcome this problem. This is only partially true. No matter how high a resolution monitor is used the effects of aliasing are bound to creep into any computer generation of photorealistic images. Some of the aliasing problems are discussed in more detail in the following sections.
Spatial Aliasing
Aliasing caused as a result of the uniform nature of the pixel grid is known as spatial aliasing.
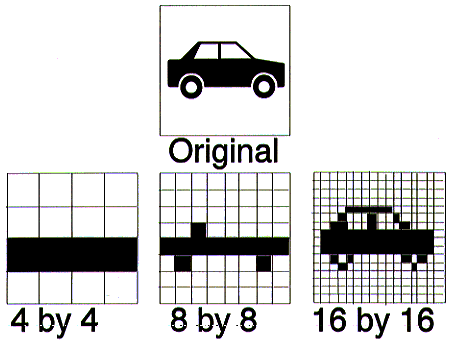
The above diagram shows a polygon displayed at a variety of monitor resolutions. The smooth edges of the original quadrilateral are approximated by the jagged edges of the monitor grid.
As the resolution of the monitor is increased, the effect of the jagged edges (jaggies) decreases.
However, the jaggies will never completely disappear, they will only get smaller.
If you have a very high resolution monitor, it may appear that there is no spatial aliasing.
However, by projecting the same image onto a hugh cinema screen the jaggies will be magnified and will thus be clearly visible.
A second effect of spacial aliasing is that very small objects, or large objects sufficiently far away, may be hidden from the rays shot through the pixels. This is shown in the diagram below, where the two rays shoot through two adjoining pixels both miss the car.
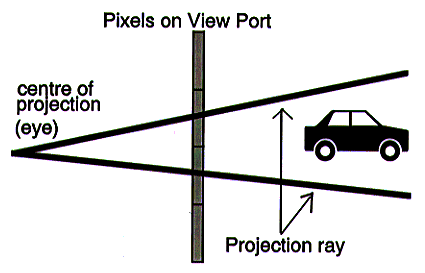
For still images... If an object is that small, then it doesn't really matter whether or not it is displayed at all.
For motion images... Spacial aliasing can cause terrible visual effects, as will be seen in the following section on temporal aliasing.
Temporal Aliasing
Temporal aliasing is aliasing produced when using computer graphics in animation.
An animation is nothing more than many still images (frames) shown in sequence.
Temporal aliasing can cause terrible visual effects.
You might think that if each still frame was very good, then the animation would also be very good. This is not the case. Two effects of temporal aliasing are:
· Disappearing/Reappearing Objects;
· Backward Rotating Wheels.
Disappearing/Reappearing Objects
The first case of temporal aliasing highlights the problem of disappearing objects discussed in the above section on spatial aliasing.
As (a relatively small) object moves across a modelled scene, it might be hidden over several frames only to suddenly 'pop' up at the next frame. After several further frames, the object will again disappear off the viewport.
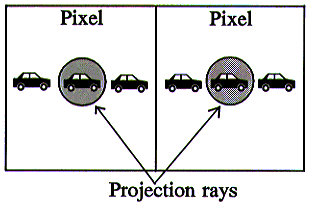
The above diagram shows a car moving across two successive pixels on a viewport.
The drawings of the car represent the car's position over a period of six time frames.
The car is only visible when it lies on a projection ray (inside either of the two circles). This means that the car is only visible for one out of every three time frames.
The car appears/disappears between successive pixels in discrete jumps rather than moving in a smooth manner.
The continual disappearance and reappearance of the car as it moves between pixels is very disconcerting to the eye.
Backwards Rotation of Wheels
The second case of temporal aliasing occurs when the frame display rate (frame sampling rate) is less then the objects velocity.
You may have noticed on television what happens as a wagon wheel accelerates from a stationary position. It initially appears to rotate in the direction of the cart's motion, as expected. However, it then appears to stop moving, and then rotates backwards! Why is this so? A film normally consists of a sampling rate of between 24 and 30 frames per second (i.e. between 24 and 30 frames are shown in sequence per second). When the wheel is rotating at a speed less than the sampling rate, a camera can correctly sample the image.
As the wheel speeds up and goes faster than the sampling rate, then it may appear to go backwards. Take the diagram below as an example. This shows a wheel sampled at four frames per second.
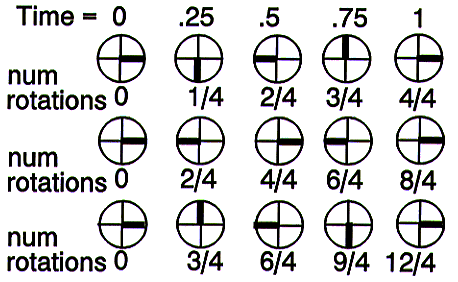
In the top row, the wheel is rotating clockwise at one revolution per second; it is correctly sampled.
In the centre row, the wheel is rotating at two revolutions per second. After sampling, we cannot tell in which direction the wheel is moving.
In the bottom row the wheel is rotating at three revolutions per second. However, it actually appears to be rotating anti-clockwise at one revolution per second.
Anti-Aliasing
Aliasing effects can always be tracked down to the fundamental point sampling nature of digital computers. We are trying to represent a continuous (analog) event with discrete samples.
We will now discuss some of the methods of dealing with aliasing.
Anti-Aliasing Lines
Depending on the slope of the line, Bresenham's line drawing algorithm may leave the resulting drawn line looking jagged. We may reduce this jagged effect by using the following anti-aliasing technique.
For any pixel that forms part of a line we can calculate the percentage of the pixel that should actually be on the line. If all of a pixel should be on the line then we colour the pixel in full intensity. If only half of the pixel should be on the line then we set the colour at half intensity, et cetera.
Unfortunately, to use this anti-aliasing technique we must use floating point numbers... somewhat reducing the gains made by using Bresenham's line algorithm in the first place!
Anti-Aliasing Polygons
Single Hue, Constant Shading
When displaying single hue polygons using constant shading, we need only concern ourselves with the lines that outline each polygon. No anti-aliasing will occur inside a polygon because all surface points on the polygon will be the same colour.
Several Hues, Non-Constant Shading
When using texture mapped polygons (resulting in a surface have more than one hue) or a non-constant shading algorithm (such as Gourand or normal-vector shading) the colouring of adjoining surface points on a polygon may differ.
The anti-aliasing methods discussed below can be used in conjunction with either single hue, constant shading or several hues, non-constant shading algorithms, but they are usually reserved for work with the latter.
Supersampling
The simplest way to counteract the effects of aliasing is to shoot lots of extra rays to generate our viewport image. We can then take the colour of each pixel to be the average colour of all the rays that pass through it. This technique is called supersampling.
We might send nine rays through each pixel, and let each ray contribute one-ninth to the final colour of the pixel. For example, if six rays shot through a pixel hit a green ball, and the other three hit a blue background, then the final colour of the pixel will be two thirds green, one third blue; a more accurate colour than either pure green or pure blue. Although supersampling can greatly reduce the effects of aliasing, it can never fully solve aliasing.
The major problem with supersampling is that it is computationally very expensive. If nine rays are sent through each pixel then the total running time of the program is increased nine fold.
Adaptive Supersampling
Adaptive supersampling offers an attempt at reducing the computational overhead associated with supersampling.
Rather than firing off some fixed number of rays through every pixel, we will use some intelligence and shoot rays only where they are needed.
One way to start is to shoot five rays through a pixel, one through the centre, and one through each of the pixel's four corners.
If all these rays return similar colours then it is fair to assume that they have all hit the same object, and therefore we have found the correct colour.
If the rays have sufficiently differing colours, then we must subdivide the pixel area into four quarters.
We will then fire five rays through each of the four regions. Any set of five rays through a region that return similar colours will be accepted as a correct colour. We will recursively subdivide and shoot new rays through each region where the five rays differ.
Because this technique subdivides where the colours change, it adapts to the image in a pixel, and is thus called adaptive supersampling.
This approach works fairly well, and is not too slow. Moreover, it is easy to implement.
However, the fundamental problem of aliasing remains. No matter how many rays we shoot into a scene, if an object is too small, it will not be visible.
This means we will still have the temporal aliasing effect of small objects appearing/disappearing between pixels in animated sequences.
Stochastic Supersampling
The problem with adaptive supersampling is that it uses a fixed, regular grid for sampling. By getting rid of this regularity in the sampling, we can minimise the effects of aliasing.
If we get rid of the regular sampling grid and replace it with an evenly distributed random grid we can greatly reduce aliasing effects. We will still shoot a regular number of rays through each pixel, but we will ensure that these rays are spread pretty randomly (or stochastically) over the whole area of the pixel. An example of this can be seen in the diagram below.
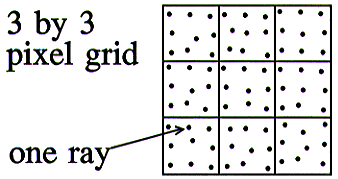
The particular distribution of rays that we use is important, so stochastic supersampling is also called distributed supersampling.
As a bonus, stochastic supersampling gives a variety of useful temporal effects, which can be used in animations. Stochastic supersampling allows us to render motion blur, depth of field, soft edges on shadows (known as penumbra regions) and other effects.
- Motion Blur
- Motion blur is caused when objects move during the exposure of a frame. A semi-transparent blur is produced trailing behind a moving object. In computer graphics, this effect is obtained by blending the current frame with previous ones. Blending precision is a factor in how many frames can be interpolated. Trying to render in real time on a slow machine can can cause streaks to be left behind objects.
- Depth of Field
- Depth of field is is where objects at the camera’s focal length appear sharp and other objects become blurred. Using a multipass buffer technique we can jitter the projection matrix for each accumulated frame.
- Penumbra
- Penumbra effects can be created by casting multiple shadow rays from a light source.
The bad news is that stochastic supersampling introduces a new problem. We now get an average colour at each pixel. Although each pixel is almost the right colour, few are exactly right. We have introduced noise. The noise is spread out over the whole monitor like static on a bad television signal. Fortunately, the human visual system can usually filter out this noise.
Statistical Supersampling
By using stochastic supersampling we may still be shooting too many rays through each pixel. As in adaptive supersampling for a regular grid, we need some method to reduce the average number of rays shot through any pixel.
We can use statistical supersampling to reduce the number of rays shot through the average pixel.
We start by shooting four randomly distributed rays through a pixel. If the colours of these rays are sufficiently similar, then stop the sampling.
Otherwise shoot another four randomly distributed rays through the pixel and test all eight rays.