Copyright Derek O'Reilly, Dundalk Institute of Technology (DkIT), Dundalk, Co. Louth, Ireland.
SASS is a super-set of CSS that includes features that allow for a CSS file to be dynamicly created. SASS stands for “syntactically awesome style sheets”. SASS 3 introduced a syntax known as SCSS. SCSS is a superset of CSS. Therefore, all valid CSS is also valid SCSS. Like CSS, SCSS uses { brackets and semicolons. SCSS allows us to write more concise CSS code.
SASS is the same as SCSS, except that SASS does not use { brackets or semicolons.
SCSS
a { text-decoration:none; background-color:red; }SASS
a text-decoration:none background-color:red
The notes below use SCSS.
In order to run SCSS, you need to have a SCSS pre-compiler installed.
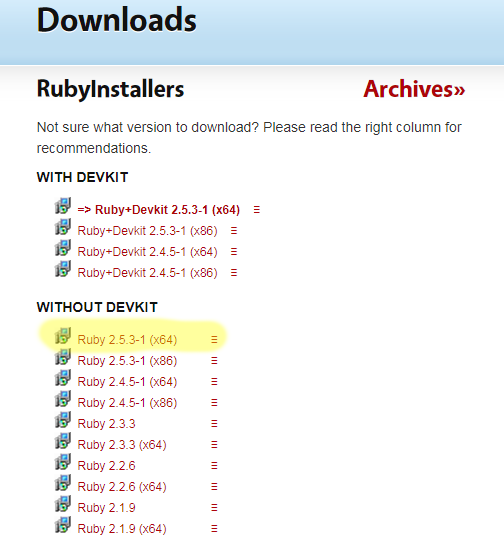
To install SCSS, firstly install Ruby from https://rubyinstaller.org/downloads/.
Download the newest version of Ruby, selecting the option to download without the devkit, as shown below:

Once Ruby is installed, you should open the "cmd" window, go to the folder where Ruby was install, and run the command below:
c:\Ruby30\bin>gem install sass
The command must be run from the "bin" sub-folder that is in the folder where Ruby was installed, as shown below:

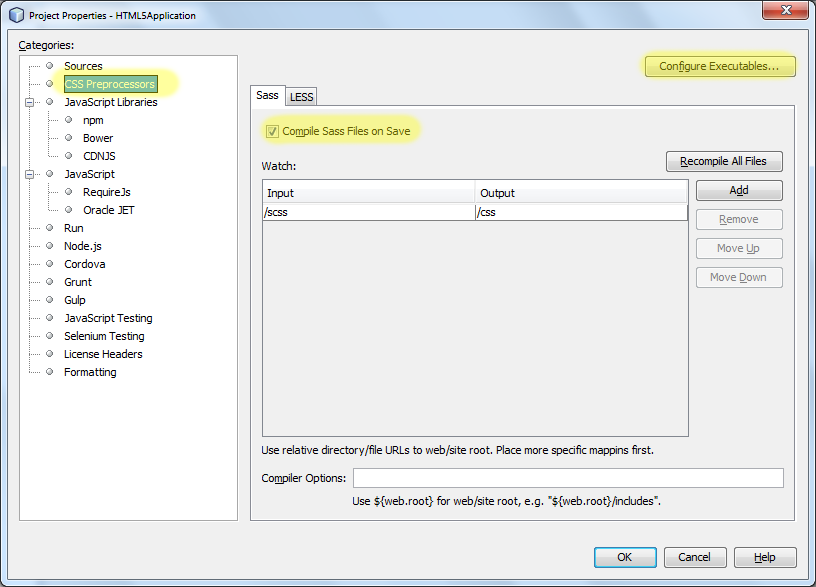
In Netbeans, right-click on the project name and select "Properties" from the list, as shown below:

Within "Properties", select "CSS Preprocessors". Within this window, tick the "Compile Sass Files on Save". Then click the "Configure Executables" button, as highlighted below.

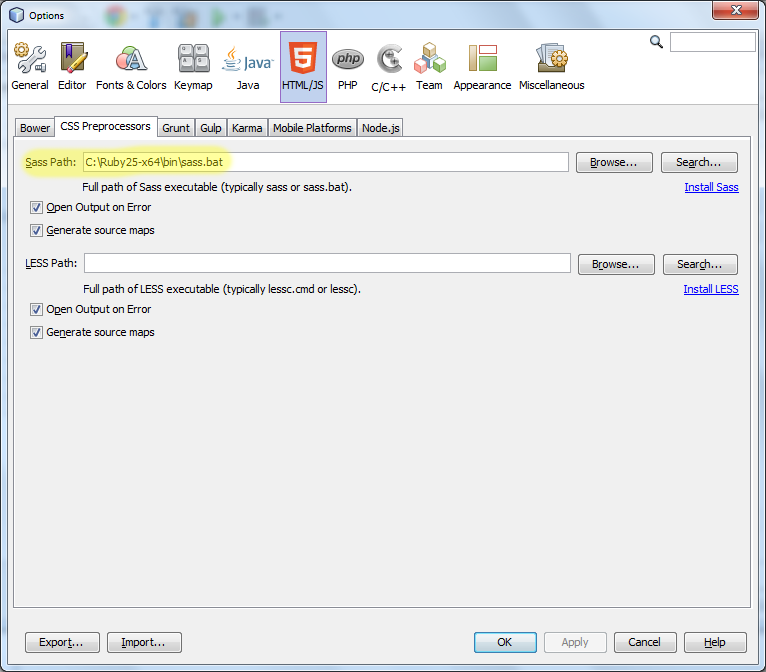
When you press the "Configure Executables" button, you will be presented with the window below. Insert the "Sass Path". It will depend on the version of Ruby that you installed, but it will be something similar to the address entered below.

You have now set up your project to automatically convert all SCSS files in the folder "scss" into CSS files in the folder "css".
SCSS variables are declared using a $ symbol. They can be placed anywhere in a SCSS file. For example:
$red: #ff0000;

.warning
{
    color: $red;
}
Make a folder called "scss". Make a file called "main.scss" and place it into the "scss" folder. Copy the code above into the file "main.scss". Save the file. A new folder call "css" will be created and a new file called "main.css" will be placed in this folder. Open the file "main.css" to see how the scss file was compiled.
SCSS variables save us from declaring the same values multiple times throughout our code.
In the code below, the colours are stored as variables:
$text_colour: #ff0000;
$dropshadow_colour: #ffaaaa;

p
{
    color: $text_colour;
    border: thin solid $dropshadow_colour;
}

h1
{
    color: $text_colour;
}
Change the code above to use a green set of colours.
The rules from one SCSS file can be mergered into another SCSS file by using @import.
To import a file from the same folder, use @import, as shown below:
@import "some_additional_styles.scss";
To import a file from an external server, use @import url(), as shown below:
@import url("some_additional_styles.scss");
Write code to move the colour information in the code below into a separate file.
$text_colour: #ff0000;
$dropshadow_colour: #ffaaaa;

p
{
    color: $text_colour;
    border: thin solid $dropshadow_colour;
}

h1
{
    color: $text_colour;
}
red.scss
$text_colour: #ff0000; $dropshadow_colour: #ffaaaa;main.scss
@import "red.scss"; p { color: $text_colour; border: thin solid $dropshadow_colour; } h1 { color: $text_colour; }
Change the code above, so as to import a green colour scheme instead of the red colour.
SCSS allows us to nest CSS rules in a hierarchy. For example, given the HTML menu below...
<nav class = "menu">
    <ul>
        <li><a href = "">Home</a></li>
        <li><a href = "">About Us</a></li>
        <li><a href = "">Products</a></li>
    </ul>
</nav>
... then the CSS code below can be used to display the HTML menu. The CSS code below contains multiple references to a class called "menu" and multiple references to the anchor "a" within the "menu" class.
.menu ul
{
    list-style: none;
    padding: 0px;
    margin: 0px;
}

.menu li
{
    width: 80px;
    text-align: center;
}

.menu a
{
    text-decoration: none;
    color: #ccc;
    background-color: #61c6f0;
    display: block;
}

.menu a:hover,
.menu a:active
{
    color: #0ac;
    background-color: #ddd;
}
In SCSS, this can be written as nested code, as shown below:
$menu_colour: #ccc;
$menu_background_colour: #61c6f0;
$menu_hover_colour: #0ac;
$menu_hover_background_colour: #ddd;

.menu
{
    ul
    {
        list-style: none;
        padding: 0px;
        margin: 0px;

        li
        {
            width: 80px;
            text-align: center;

            a
            {
                text-decoration: none;
                color: $menu_colour;
                background-color: $menu_background_colour;
                display: block;

                &:hover,
                &:active
                {
                    color: $menu_hover_colour;
                    background-color: $menu_hover_background_colour;
                }
            }
        }
    }
}
Note the use of &:hover and &:active in the code above. Here, the & refers to the parent selector.
Test the SCSS code above with the menu below.
<nav class = "menu">
    <ul>
        <li><a href = "">Home</a></li>
        <li><a href = "">About Us</a></li>
        <li><a href = "">Products</a></li>
    </ul>
</nav>
The @extend directive lets us reuse properties from one tag, class or id style inside another tag, class or id style.
The @extend directive is useful if two tags, classes or ids only differ in some small details.
.button
{
    background-color: #aaaaaa;
    color: white;
    border: none;
    padding: 20px;
    text-align: center;
    cursor: pointer;
    text-decoration: none;
}

.red_button
{
    @extend .button;
    background-color: red;
}

.green_button
{
    @extend .button;
    background-color: green;
}
Apply the SCSS code above to the HTML code below:
<a class="button" href="#">Default Button</a>
<a class="red_button" href="#">Red Button</a>
<a class="green_button" href="#">Green Button</a>
@mixin are similar to @extend, except that @mixin can have parameters passed to them.
A mixin is declared using the @mixin keyword.
A mixin can be inserted into code by using the @include keyword.
Parameters can be passed to a mixin. If parameters are passed to a mixin, they can be used to set the mixin's properties.
A mixin parameter can have default values. In the example below, all of the parameters have a default value set:
$red:#ee3333;
$green:#33ee33;
$blue:#3333ff;
$background_colour:white;

@mixin absolute($left:0px, $top:0px, $width:100px, $height:100px, $z_index:1)
{
    position: absolute;
    overflow: auto;
    z-index:$z_index;
    left: $left;
    top: $top;
    width: $width;
    height: $height;
    background-color: $background_colour;
}

#div1
{
    border: thin solid $red;
    @include absolute(50px, 50px, 150px, 150px, 2);
}

#div2
{
    border: thin solid $green;
    @include absolute(250px, 100px, 150px, 100px);
    overflow:scroll;
}

#div3
{
    border: thin solid $blue;
    @include absolute(150px, 150px, 200px, 100px);
}
Test the above code.
Search online for a mixin library that can be used for styling buttons.
Some CSS properties are not fully supported across all browsers. In this case, we should list the property along with each browser's prefix (e.g. -webkit- for Chrome and Safari). After this list, we should write the W3C version of the property, as shown below:
-webkit-mask-box-image: url(mask_image.gif);
-moz-mask-box-image: url(mask_image.gif);
-ms-mask-box-image: url(mask_image.gif);
-o-mask-box-image: url(mask_image.gif);
mask-box-image: url(mask_image.gif);
Write a maxim for the mask-box-image property, as shown here.
SCSS
@mixin mask_box_image($mask_image) { -webkit-mask-box-image: url($mask_image); -moz-mask-box-image: url($mask_image); -ms-mask-box-image: url($mask_image); -o-mask-box-image: url($mask_image); mask-box-image: url($mask_image); } #masked_image { @include mask_box_image("../images/mask_image.gif"); }HTML
<img id = "masked_image" src = "images/dkit02.gif">
Copyright Derek O' Reilly, Dundalk Institute of Technology (DkIT), Dundalk, Co. Louth, Ireland.